
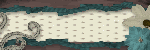
SOLDIERS GIRL
CLICK ON TAG TO VIEW FULL SIZE
 For this tutorial I am using the wonderful work of Michael Landefeld and you can purchase this work at CILM HERE.
My Soldiers Girl Supplies which includes the dog tags and word art which original comes from my Military Collab kit. If you just want the dog tags and word art for this tut I have zipped them together and you can download from my 4shared HERE. If you would like the whole Military Collab kit you can download that from my 4shared as well HERE.
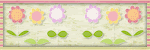
OK as far as the scrap kit, it is a FTU scrap kit, it is a full sized kit so you will have to resize your layers to your liking. I downloaded this kit long ago and have searched high and low for the site that I originally got it from. The kit is called A4LD-LETTERS HOME. It is a kit created by Jessica Lopez from All 4 Love Designs. I've searched every different aspect I could think of to find the site. I emailed the email on the TOU but havent heard back yet. So as of right now I've uploaded the kit to my 4shared and will leave it that way until I find out the site to go to. If you know this info I would greatly appreciate it. Thank you.
FROM MY 4 SHARED...
Delete Missy's copy right layer on template 13. Then go to image, canvas size 600x600. Flood fill your bottom/background layer with white to fill in the extra.
Add a lew raster layer above this layer. In your color pallette make your foreground #79644d (or color of choice). Background #768175 (or color of choice). Click on your foreground layer, gradient, Angle 45, Repeat 3. Flood fill your new raster layer with this gradient. Go to layers, new mask layer, from image, from your drop down menu choose Vix Mask 147, click OK. On your layers pallet on the right click on your original mask and merge group.
Click on circle layer on Missy's template. Selections, select all, float, defloat, copy and paste paper of choice, I used paper 4. Selections, invert, delete on your keyboard. Selections, select none. Delete original circle layer and add drop shadow of choice to your new circle layer.
Click on frame rectangle. Selections, select all, float, defloat, copy and paste paper of choice, I used Paper 2. Selections, invert, delete on your keyboard. Do not deselect yet. Copy and paste close up tube of choice. I made my close up at 100% opacity and mirrored my image (just adding this in case you use the same tube). Place inside frame area and hit delete on tube to get rid of excess. Selections, select none and delete your original frame rectangle layer. Add a drop shadow of choice to both your new frame rectangle layer and tube layer. On your tube layer go to effects, plugins, xero, radiance with this setting:
Strangeness - 128Charm - 50Truth - 128Beauty - 255
(The above process is optional)
Strangeness - 128Charm - 50Truth - 128Beauty - 255
(The above process is optional)
Change your blend mode on your tube to luminance legacy.
On your lines, add drop shadow of choice.
Click on your rectangle frame, selections, select all, float, defloat. Add new raster layer and flood fill with color of choice. I used #877159. Selections, select none. Delete your original rectangle frame. On the new rectangle frame I added an inner bevel by going to effect, 3D effects, Inner Bevel with the following settings:
Bevel #2
Width: 10
Smoothness: 9
Depth: 2
Ambience: 0
Shinniness: 20
Color: White
Angle: 43
Intensity: 30
Elevation: 55
Add drop shadow of choice.
Click on the small stars layer, selection, select all, float, defloat, copy and paste paper of choice, I used Paper1. Selections, invert, delete on your keyboard. Selections, select none. Delete your original small stars layer and add a drop shadow of choice.
Click on the large stars layer, selections, select all, float, defloat, add new raster layer and flood fill with olor of choice, I used #877159. Selections, select none. Delete your original large stars layer. I also added an inner bevel to the large stars layer using the same settings as above. Add drop shadow of choice.
Copy and paste main tube of choice, I mirrored mine. Place where you think looks best. Add drop shadow of choice.
Add your dog tags and word art if you'd like. Resize as needed. Add drop shadow of choice. I placed my dog tags on top of the stars layers and erased parts of it so it looks like it was weaving through it.
Resize your tag to your liking.
Add copy right info.
Add your name.
All done!!
Hope you've enjoyed this tut. Hugs, Dawn
littlefieldswife@yahoo.com
All done!!
Hope you've enjoyed this tut. Hugs, Dawn
littlefieldswife@yahoo.com


thank you for sharing this. I have to learn again how to make tags.. I'm going to try to see how it comes out LOL....
ReplyDeleteHave a great weekend.
very nice baby abaraje en la bañera
ReplyDeletehttp://www.sabaleplus.blogspot.com/
What a great tut, I enjoyed it very much, thank you! :)
ReplyDelete